Step-by-Step Guide to Configuring CI/CD Pipelines in Jenkins
 18m, 30s
 2
2
09:42, 03.02.2025
Jenkins is an automation server, commonly used for setting up CI/CD pipelines. It's suited for both small projects and large-scale enterprise workflows, offering powerful tools to streamline and automate the software delivery process. Whether you're working on simple tasks or managing intricate operations, Jenkins adapts to meet the needs of diverse development environments, making it a go-to solution for continuous integration and deployment across various industries.
This guide will walk you through the steps to install Jenkins, configure it, and set up a basic CI/CD pipeline for automating your software development process.
What you’ll need
Before we begin, make sure you have:
- A deployed server with the OS of your choice.
- Installed Java (JDK 11 or later) on the server.
- Installed Git on the server for code repositories.
- (Optional) Installed Docker for containerized applications.
- Access to the server through SSH with administrator privileges.
Steps to Set Up Jenkins
You can go about the Jenkins setup in two ways.
You can go to the Jenkins download page and install it, choosing the appropriate version for your machine.
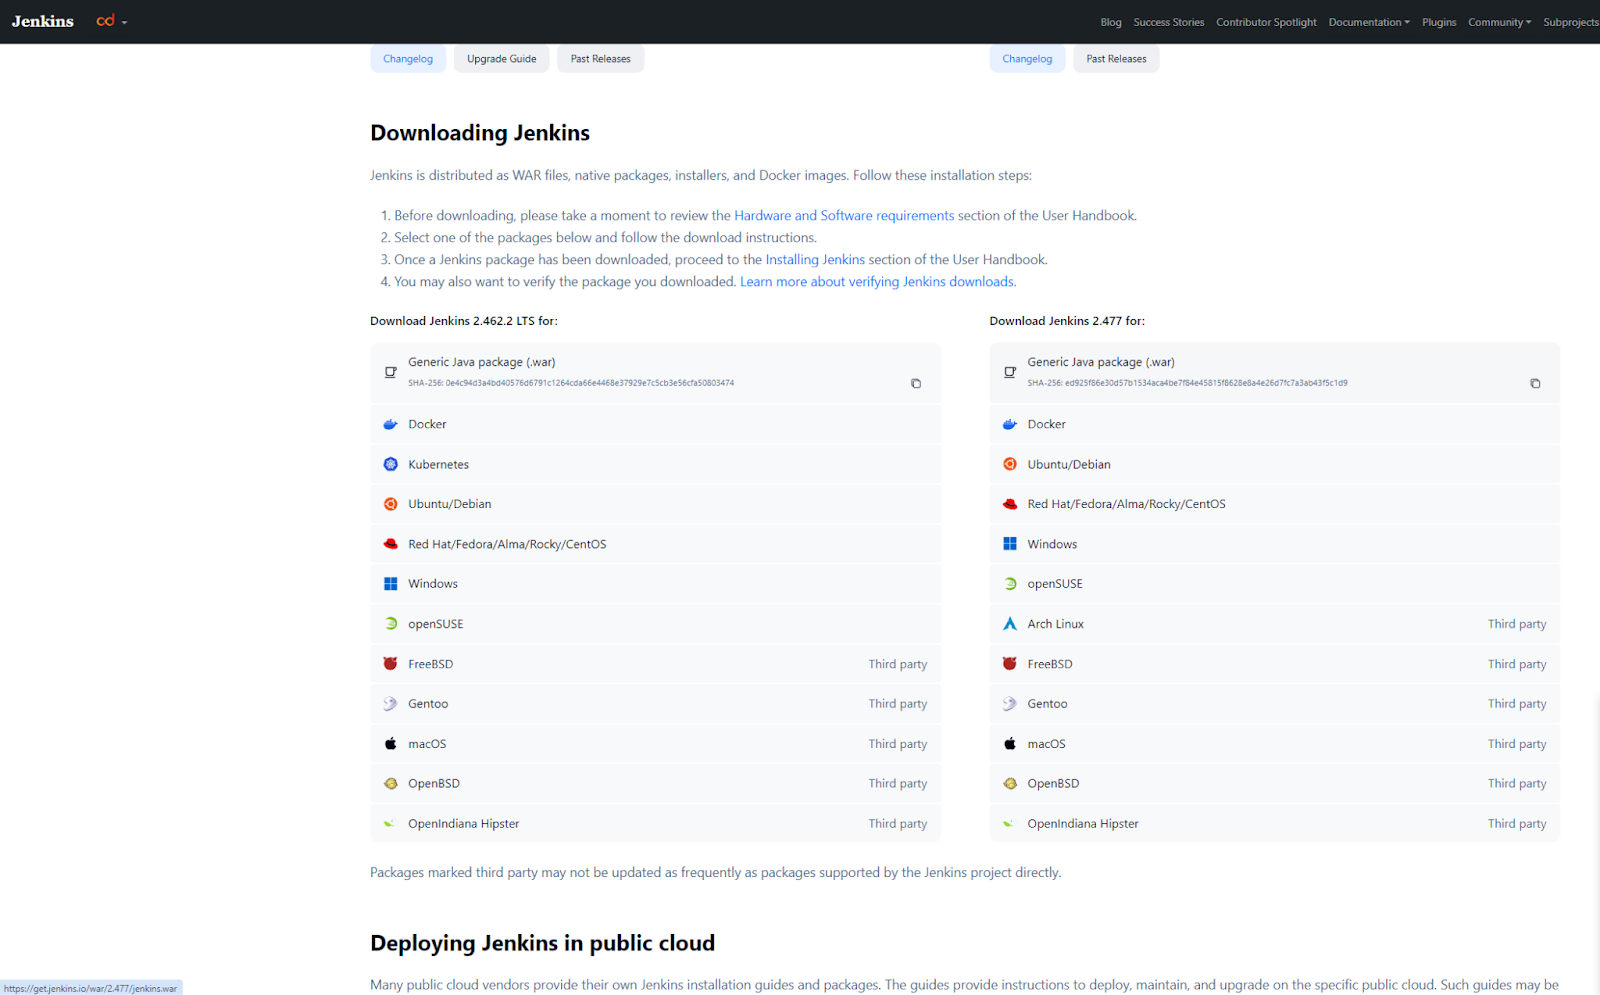
Once you’ve downloaded Jenkins files, you’ll see a setup Wizard.
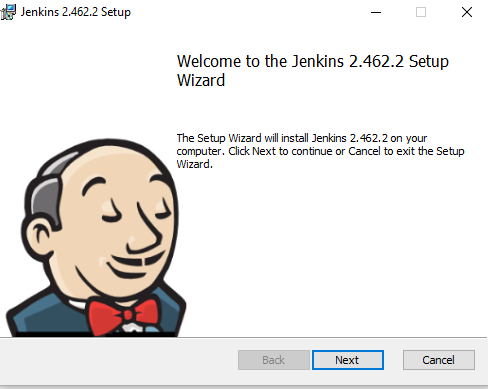
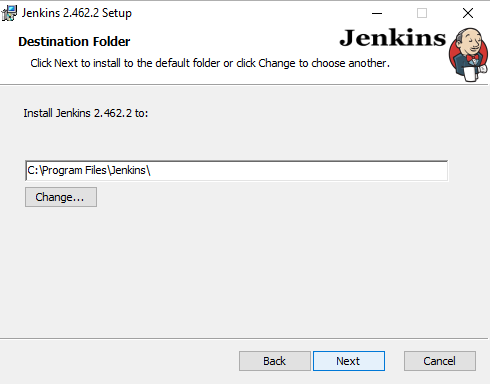
Next, you’ll need to specify the destination folder for the program.
Finally, you’ll get the service logon credentials.
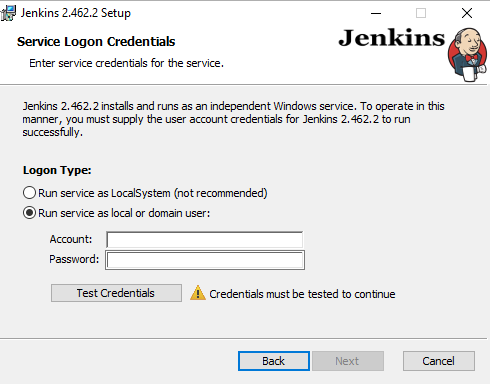
Here, make sure you run Jenkins as a local or domain user because if Jenkins runs as LocalSystem, it’ll get full access to your machine, which isn’t not at all safe.
To run Jenkins as a local or domain user, you need to insert a domain user name and a password to the account you want to run Jenkins with, then click on Test Credentials to test them and then click on Next. After that, you’ll be asked to:
- select a port on which Jenkins will be running, and then to test it.
- select Java home directory.
- select other services you want to be installed with Jenkins.
- confirm installation.
Or, with your server prepared, you can install Jenkins by following these steps:
- Add the Jenkins GPG key and repository: sudo wget -O /usr/share/keyrings/jenkins-keyring.asc \https://pkg.jenkins.io/debian/jenkins.io-2023.keyecho "deb [signed-by=/usr/share/keyrings/jenkins-keyring.asc]" \https://pkg.jenkins.io/debian binary/ | sudo tee \ /etc/apt/sources.list.d/jenkins.list > /dev/null
- Update your package list: sudo apt update
- Install Jenkins: sudo apt install jenkins
- Start and enable Jenkins service: sudo systemctl start jenkins sudo systemctl enable jenkins
How to Access the Jenkins Dashboard
With Jenkins up and running, you can access the Jenkins UI for the initial setup:
- Open a web browser and navigate to http://<your-server-ip>:8080.
- To unlock Jenkins, get the admin password by running:
sudo cat /var/lib/jenkins/secrets/initialAdminPassword - Enter the password in the Jenkins UI and follow the setup wizard.
- Install the suggested plugins.
- Create your admin user and complete the setup.
Once the setup is complete, you'll be redirected to the Jenkins dashboard to begin configuring your CI/CD pipeline.
Configure Jenkins Settings
With Jenkins installed, the next step is to configure it for the specifics of your CI/CD pipeline. Steps below will help you set up credentials for accessing external services and configure the global tools Jenkins will use during builds and deployments. This includes adding credentials for version control systems like GitHub and setting up tools like Java, Maven, and Docker, which will be required in various stages of your pipeline.
Install Essential Plugins
Jenkins’ true power lies in its extensive plugin ecosystem, which allows you to customize the system. To get started with a CI/CD pipeline, you’ll need to install several essential plugins:
- Git Plugin: This enables Jenkins to interact with Git repositories, allowing you to clone, build, and push code.
Go to Jenkins Dashboard > Manage Jenkins > Manage Plugins > Available. Search for Git Plugin and install it. - Pipeline Plugin: Essential for defining and executing Jenkins pipelines through a Jenkinsfile, this plugin automates your build, test, and deployment processes.
Search for Pipeline and install it. - Docker Pipeline Plugin (Optional): If you plan to integrate Docker into your pipeline, this plugin allows you to incorporate Docker commands into your Jenkinsfile, facilitating the build and management of Docker containers.
Search for Docker Pipeline and install it. - Credentials Binding Plugin: This plugin helps manage and use credentials securely within your pipelines, such as API tokens or passwords.
Search for the Credentials Binding Plugin and install it.
With these plugins, Jenkins’ functionality is greatly enhanced, enabling you to create more advanced and automated pipelines.
Set Up Credentials
To enable Jenkins to securely interact with GitHub, Docker Hub, or other third-party systems, you need to set up and manage credentials. Here’s how you can do that:
- Navigate to Credentials:
- Go to Jenkins Dashboard > Manage Jenkins > Manage Credentials. - Add Credentials - Choose the appropriate domain (usually Global unless you’re organizing credentials by project).
- Click (global) under Stores scoped to Jenkins, then select Add Credentials. - Select Credential Type -For GitHub or GitLab, choose Username with password or Secret text(for API tokens).
-For Docker Hub, select Username with password. Enter the required details, such as username, password, or API token, and provide a meaningful ID for easy reference. - Save Credentials
- After adding your credentials, they will be securely stored in Jenkins and can be used in your pipelines.
Setting up credentials ensures Jenkins can interact with other services securely, such as pulling code from a repository or pushing Docker images, without exposing sensitive information.
Define Global Tool Settings
For Jenkins to build, test, and deploy your applications, it needs access to development tools. Configuring these global tools ensures that Jenkins knows where to find them on your system.
- Navigate to Global Tool Configuration
- Go to Jenkins Dashboard > Manage Jenkins > Global Tool Configuration. - Set Up Git:
- Under Git, click Add Git.
- If Git is installed in a standard location, Jenkins should auto-detect it. If not, specify the path to the Git executable. - Set up Maven (If applicable)
- If your project uses Maven for building, scroll to Maven, click Add Maven, and either let Jenkins install it automatically or specify the installation path. - Set Up Gradle (If applicable)
- Similar to Maven, under Gradle, click Add Gradle, and choose to install automatically or specify the path.
Once these tools are configured, Jenkins will be able to invoke them during pipeline execution, ensuring that your builds run smoothly regardless of the technologies involved.
Create Your First Pipeline
With Jenkins set up and ready, the next step is to create a pipeline to automate your build, test, and deployment processes. Follow these steps to establish a basic pipeline.
Start a New Jenkins Project
Jenkins provides various job types. For a CI/CD pipeline, the Pipeline job type is usually the best choice due to its flexibility and compatibility with Jenkinsfiles.
- Navigate to New Item
- From the Jenkins Dashboard, click New Item. - Choose Job Type
- Enter a name for your job (e.g., MyFirstPipeline).Select Pipeline from the list of job types and click OK. - Configure the Job
- You’ll be directed to the job configuration page where you can set up your pipeline’s behavior.
The Pipeline job type is ideal for complex CI/CD workflows because it allows you to define the entire pipeline in a Jenkinsfile, making it easy to manage and version control.
Write a Jenkinsfile
The Jenkinsfile is a text file that defines your CI/CD pipeline as code. This file is written using a domain-specific language (DSL) provided by Jenkins and is typically stored in the root directory of your project's source control repository. It describes the steps Jenkins should take to build, test, and deploy your application.
- Understand the Jenkinsfile Structure:
- A basic Jenkinsfile usually includes stages such as Build, Test, and Deploy. Each stage contains steps that specify the actions Jenkins will perform. Create a Simple Jenkinsfile:
pipeline { agent any
stages {
stage('Clone Repository') {
steps {
git '<https://github.com/your-repo/your-project.git>'
}
}
stage('Build') {
steps {
// Example build step
sh 'make build'
}
}
stage('Test') {
steps {
// Example test step
sh 'make test'
}
}
}
}
- pipeline: The top-level block defining the entire pipeline.
- agent: Specifies where the pipeline should run; any means it can run on any available agent.
- stages: A block containing all the pipeline stages.
- stage: Defines an individual stage in the pipeline, such as Clone Repository, Build, or Test.
- steps: Commands or actions Jenkins executes within each stage.- Add the Jenkinsfile to Your Repository:
Save the Jenkinsfile in the root directory of your project’s repository.
Define Build Triggers
Build triggers in Jenkins determine when and how your pipeline is going to run. Jenkins offers a range of trigger options, from manual starts to automated triggers.
- Navigate to Build Triggers: In your job’s configuration page, scroll down to the Build Triggers section.
- Choose a Trigger Method:
- Poll SCM: Jenkins will periodically check your source code repository for changes. Set the polling frequency (e.g., *H/5 * * * ** for every 5 minutes).
- GitHub Hook Trigger: For GitHub users, configure a webhook to trigger the pipeline automatically when there is a new push or pull request.
- Build Periodically: Schedule the pipeline to run at specific intervals using a cron-like syntax.
- Manual Trigger: Trigger builds manually from the Jenkins dashboard whenever needed. - Configure the Trigger: For webhooks, ensure that your repository is set up to send POST requests to Jenkins when changes occur. Jenkins will listen to these requests and trigger the pipeline accordingly.
Run the Pipeline Job
Run the Pipeline: On your job’s page, click Build Now to manually trigger the pipeline. If you’ve set up automatic triggers, the pipeline will start automatically when the specified event occurs (e.g., a code push).
Monitor the Build Process: Jenkins will show real-time progress for each stage. You can view logs, check the status of each stage, and address any issues that may arise. If the pipeline completes successfully, you’ll see a green checkmark for all stages.
Review the Results: After the pipeline finishes, review the build logs and results. Jenkins will provide detailed information on the executed steps, any errors encountered, and the overall success or failure of the pipeline.
Connect Jenkins to Source Control
Integrating Jenkins with version control systems such as GitHub or GitLab is crucial for automating your CI/CD pipeline. You need to configure Jenkins to automatically trigger builds when changes are pushed to the repository.
Link to GitHub Repositories
To get started, you need to connect Jenkins to your GitHub or GitLab repository. This connection enables Jenkins to receive notifications (webhooks) when changes occur in your repository and to securely authenticate when accessing your codebase.
- Configure Authentication:
- Generate a Personal Access Token: Navigate to GitHub > Settings > Developer settings > Personal access tokens > Generate new token. Select the required scopes, such as repo and admin:repo_hook.
- Add the Token to Jenkins: In Jenkins, go to Manage Jenkins > Manage Credentials > (global) > Add Credentials.
- Choose Secret text for the token, enter the token, and assign a descriptive ID (e.g., github-token). - Set Up Webhooks: Go to your repository on GitHub and navigate to Settings > Webhooks > Add webhook. Set the Payload URL to http://your-jenkins-url/github-webhook/ and choose application/json as the content type. Select the events that will trigger the webhook, typically Just the push event and Pull requests.
- Configure the Jenkins Job:
- Link to Your Repository:In your Jenkins job configuration, under the Pipeline section, specify your repository’s URL in the format https://github.com/your-repo/your-project.git.
- Use Credentials: Ensure Jenkins uses the credentials (personal access token) you added earlier. Select these credentials from the Credentials dropdown in the SCM section of your job configuration.
With authentication and webhooks configured, Jenkins will be connected to your GitHub or GitLab repository, allowing it to pull your code and trigger builds automatically.
Manage Branch and PR Builds
To fully utilize Jenkins, it’s crucial to configure it for building feature branches and pull requests. This setup helps detect integration issues early, enhancing the overall quality of your code.
Set Up a Multibranch Pipeline: A Multibranch Pipeline job in Jenkins automatically creates pipelines for all branches in a repository, building each branch based on its own Jenkinsfile.
- Create a Multibranch Pipeline Job:From the Jenkins Dashboard, click New Item and select Multibranch Pipeline. Name your job (e.g., MyProject-Multibranch).
- Configure Branch Sources:In the job configuration, under Branch Sources, add your GitHub repository and use the credentials you set up earlier.
- Set the Scan Multibranch Pipeline Triggers to periodically check for new branches or updates, or to respond to webhook events.
2. Branch Build Configuration: Jenkins will automatically discover and build all branches with a Jenkinsfile. You can customize how different branches are handled.
- Exclusions and Filters: Exclude certain branches from being built by configuring the Property Strategy within branch sources. For example, you can use a regular expression to filter out branches with specific naming patterns.
- Specific Branch Configuration: Define specific behaviors for branches using the when directive in your Jenkinsfile. For instance, you can specify that certain stages only run for the main branch:
stage('Deploy') {
when {
branch 'main'
}
steps {
// Deployment steps here }
}
3. Pull Request Builds: Jenkins can automatically build pull requests to test proposed changes before merging them into the main branch.
- Enable Pull Request Builds: In the Multibranch Pipeline job configuration, Jenkins will detect pull requests if using a supported source like GitHub or GitLab. These pull requests will appear as separate branches and can be built similarly to other branches.
- Set Up Status Reporting: Jenkins can report the build status of pull requests back to GitHub or GitLab, allowing you to see build results directly within the pull request.
- Ensure your personal access token has the necessary permissions (repo:status for GitHub or api for GitLab).
Set Up Build Notifications
To keep your team up to date about build and deployment statuses, it's essential to set up notifications in Jenkins. Notifications can be sent via email or integrated with collaboration tools like Slack or Microsoft Teams, ensuring everyone stays updated on the success or failure of each pipeline.
Email Alerts Configuration
Email notifications are a simple yet effective way to keep your team informed about build results. Jenkins can automatically send these notifications at different stages of the pipeline.
- Install the Email Extension Plugin:
- Go to Jenkins Dashboard > Manage Jenkins > Manage Plugins > Available, search for Email Extension Plugin, and install it if not already installed. - Configure the SMTP Server:
- Navigate to Manage Jenkins > Configure System.
- Scroll to the Extended E-mail Notification section and enter your SMTP server details:
- SMTP server: The address of your mail server (e.g., smtp.yourdomain.com).
- SMTP port: Use 587 for TLS or 465 for SSL.
- SMTP Authentication: Check this if your server requires a username and password.
- Use SSL/TLS: Enable this if your SMTP server requires SSL or TLS. - Set Up Email Notifications in the Pipeline: You can define email notifications directly in your Jenkinsfile to send alerts based on the build status:
groovy
Copy code
pipeline {
agent any
stages {
stage('Build') {
steps {
sh 'make build'
}
}
}
post {
success {
emailext subject: "Build Success: ${env.JOB_NAME} #${env.BUILD_NUMBER}",
body: "Good news! The build succeeded.",
to: 'team@example.com'
}
failure {
emailext subject: "Build Failed: ${env.JOB_NAME} #${env.BUILD_NUMBER}",
body: "Oops! The build failed. Please check the logs.",
to: 'team@example.com'
}
}
}
- post: This block defines actions that run after the pipeline finishes, like sending emails.
- success and failure: Specify what to do when the build succeeds or fails. The emailext step sends the email with the relevant subject and body.
Slack or Teams Integration Setup
For teams using collaboration tools like Slack or Microsoft Teams, integrating Jenkins with these platforms ensures that build notifications are delivered directly to team channels, providing real-time updates.
Slack Integration
Install Slack Notification Plugin:
- Go to Jenkins Dashboard > Manage Jenkins > Manage Plugins > Available.
- Search for Slack Notification Plugin, install it, and restart Jenkins if necessary.
Configure Slack Integration:
- Go to Manage Jenkins > Configure System.
- Scroll down to the Slack section and enter the following details:
- Workspace: Enter your Slack workspace name.
- Credential: Add your Slack integration token (obtained by creating an incoming webhook or via Slack's Jenkins CI app).
- Default Channel: Specify the Slack channel where notifications should be sent by default.
Add Slack Notifications to Jenkinsfile:
groovy
Copy code
pipeline {
agent any
stages {
stage('Build') {
steps {
sh 'make build'
}
}
}
post {
success {
slackSend channel: '#build-notifications', color: 'good',
message: "Build Success: ${env.JOB_NAME} #${env.BUILD_NUMBER}"
}
failure {
slackSend channel: '#build-notifications', color: 'danger',
message: "Build Failed: ${env.JOB_NAME} #${env.BUILD_NUMBER}"
}
}
}
Microsoft Teams Integration
- Create an Incoming Webhook in Microsoft Teams:
- In Microsoft Teams, go to the channel where you want to receive notifications.
- Navigate to More options (⋯) > Connectors > Incoming Webhook. Name the webhook and copy the provided URL. - Install Microsoft Teams Notification Plugin:
- Go to Jenkins Dashboard > Manage Jenkins > Manage Plugins > Available.
- Search for Office 365 Connector Plugin, install it, and restart Jenkins if necessary. - Configure Teams Integration:
- Go to your Jenkins job configuration page.
- Scroll to the Office 365 Connector section and paste the webhook URL from Teams. - Add Teams Notifications to Jenkinsfile:
groovy
Copy code
pipeline {
agent any
stages {
stage('Build') {
steps {
sh 'make build'
}
}
}
post {
success {
office365ConnectorSend message: "Build Success: ${env.JOB_NAME} #${env.BUILD_NUMBER}",
webhookUrl: 'YOUR_WEBHOOK_URL'
}
failure {
office365ConnectorSend message: "Build Failed: ${env.JOB_NAME} #${env.BUILD_NUMBER}",
webhookUrl: 'YOUR_WEBHOOK_URL'
}
}
}
This setup ensures that your team receives real-time notifications in Slack or Microsoft Teams, keeping everyone informed about the state of the build process.
Was this article helpful to you?
 Yes
Yes
 No
Yes
No
No
Yes
No
VPS popular offers
-
-10%€21.15/mo€ 23.5 /moBilled annually
 CPU6 Xeon Cores
 RAM8 GB
 Space100 GB SSD
 BandwidthUnlimited
 -
-4.4%€32.5/mo€ 34 /moBilled annually
CPU4 Xeon Cores
RAM2 GB
Space75 GB SSD
BandwidthUnlimited
-
-9.1%€60/mo€ 66 /moBilled annually
CPU4 Xeon Cores
RAM4 GB
Space100 GB SSD
BandwidthUnlimited
-
-10%€49.5/mo€ 55 /moBilled annually
CPU6 Epyc Cores
RAM16 GB
Space150 GB NVMe
BandwidthUnlimited
-
-16.3%€40.17/mo€ 48 /moBilled annually
CPU4 Xeon Cores
RAM2 GB
Space30 GB SSD
Bandwidth40 Mbps
-
-9%€35.5/mo€ 39 /moBilled annually
CPU6 Epyc Cores
RAM8 GB
Space100 GB NVMe
BandwidthUnlimited
-
-7.2%€19.95/mo€ 21.5 /moBilled annually
CPU4 Xeon Cores
RAM4 GB
Space100 GB SSD
BandwidthUnlimited
-
-7.9%€26.7/mo€ 29 /moBilled annually
CPU6 Xeon Cores
RAM8 GB
Space200 GB HDD
BandwidthUnlimited
-
-13.1%€6.08/mo€ 7 /moBilled annually
CPU2 Xeon Cores
RAM512 MB
Space10 GB SSD
Bandwidth300 GB
-
-16.2%€56.17/mo€ 67 /moBilled annually
CPU4 Xeon Cores
RAM4 GB
Space50 GB SSD
Bandwidth60 Mbps